"Are You Seeking Knowledge
About Wood Stairs?"

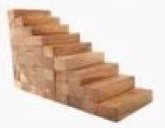
If it's knowledge about stairs you seek, you are at the right place. In this series of articles we will illustrate for you the basic types, how to calculate their layout, and how to construct them and install them to achieve a first-class professional job no matter where you are building them.
Like roof framing, garage stairway design and layout is a matter of simple math, and sometimes a little basic trigonometry. We will show you how to do it with an inexpensive calculator. There are some tricks involved, so pay close attention when it comes to information concerning the bottom step and top step.
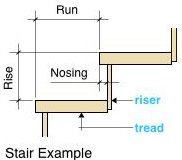
Building codes throughout the world have a lot to do with the layout and design. For instance, there are maximum distances allowed between each tread called the rise. The rise can't vary by more than 1/4" from one tread to the next. Then there is the tread itself, and there is a minimum dimension for this (the run) for your foot to rest upon as you ascend or descend. The other key ingredient is the nosing and there is a minimum dimension for this of 1-1/4".
The nosing is that part of the tread that overlaps the tread below it and is not part of the run. There are some variances between different building codes from one jurisdiction to the next, so always check locally to see what code version your jurisdiction is using. See the example diagram below.

Safety, is the key to strive for in your design under the building codes today. Steep units are no longer allowed due to the tendency that they have to cause accidental falls. What is steep you ask? According to many building codes, it is any angle sharper than 42.51°. In other words, if it exceeds a rise of 8-1/4" with a run of less than 9".
Most builders would tell you that even this degree of angle is too steep, especially for children and the elderly. Your editors tend to agree. We will show you how to build safe and serviceable units for your garage (or elsewhere) that are graceful in design and appearance. Keep in mind that this subject-matter is somewhat complex and you may have to practice what you learn in this chapter on some scrap-material before you layout and cut into expensive structural-grade wood.
We recommend making a dry-run on a piece of 1 x 12 - #3 common pine before you layout your final stringers on 2 x 12 structural wood. This way you can make just two sets of cuts, one at each end, and see if your stringer fits into place as it should before proceeding to the real thing. Once you have your 1 x 12 test stringer into place you can check your line-work on it to see if the risers are plumb and the treads are level using a small torpedo-level.
It is not as hard as you may think, so stick with us here and we will show you all the basics and a few tricks to help you do it like a professional.
Next, visit our pages: Stair Types, Layout Primer, Stringer Primer,
❖ Testimonials ❖
We have been following your blog and we have found a lot of useful information in it.
Cecil Sibanda
Product Coordinator
Dorman Products, Inc.
Colmar, PA
I was pleased that I was able to easily find the proper tall storage cabinet for my garage. I needed lockable storage to keep my toddler away from sharp tools and solvents that my husband stores. Garagetips-101 solved my problem!
Renee M.
I love the detail in your garage building pages. They helped me understand how to engineer a foundation for a garage we are planning that our building department will approve. I had the inspector go to your pages and review what I was talking about. Now, I am studying the wall framing sections, as we plan to build it ourselves this fall. Thank you so much for the great information.
R.G.,
Des Moines, IA
Great stuff on wall framing. I never really understood the on-and-off spacing concepts for the wall studs until I read your explanations.
Will,
Grand Island, NE


