"Would Mud Jacking
Save Your Garage Floor?"
Investigate the procedure of mud jacking your failed garage floor or driveway before tearing them out for replacement. It could save you thousands of dollars in unnecessary expense.
Most failed garage floors and driveways are caused by the type of soil that was used beneath them. Professional Geotechnical Engineers generally refer to it as sugar clay although there are other names for it. Like sugar, it dissolves when it gets wet and shrinks away from the concrete slab when it dries out. This leaves the concrete slab sitting above it without any support whatsoever and the usual cracking and differential settlement occurs over time leaving the floor or driveway less than serviceable. Sugar clay falls into the category of treacherous soils and is not a stable base (even if compacted) for any structural purpose including placing a non-structural concrete floor slab on top of it. It is usually the source-cause of all necessary concrete repair.

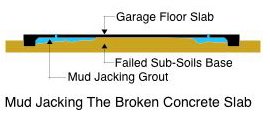
As a concrete repair, mud jacking has proven to be an effective cost saving method short of tear-out and replacement. The diagram at the left shows how it is accomplished and it is one of the better garage floor repairs available. As the diagram shows, small diameter holes are drilled into the failed concrete slab (about 1.25" diameter) and an tube is placed into the hole. A grout (the composition varies) is pumped under pressure into the underside area of the concrete slab to fill the void left by the treacherous soils as they dissolved away.
As the void fills, the pressure lifts the slab back up into it's proper elevation. An experienced operator (mud-jacker) knows just when to stop the flow of the grout to keep the slab from over-rising above the desired elevation. Once this phase is completed, the drill-holes are closed (with grout) and the internal grouting is allowed a cure time of about twenty-eight (28) days before any heavy loads such as autos are placed upon it.
The grout fills the entirety of the void because of the pressure it is under and reaches everywhere a void exists until all voids in that general area are full. Then, in what appears as a feat of gravity defiance, the slab will start visibly lifting into it's original position due to the upward acting pressure.
The number of drill-holes depends upon how badly the slab is cracked across the entire surface of the garage floor in question. You editors have seen entire 10' x 10' concrete panels in public streets lifted with just one drill-hole. In other cases, we have seen smaller slabs require two (2) drill-holes to get the slab back into proper elevation at all four corners. As a general rule, a garage floor will take no more than four (4) drill-holes, but ultimately this has to be determined by the skilled mud-jacker performing the work.
For residential purposes, the grout mixture usually consists of water, portland cement, and some small aggregate (sand) mixed into it that is capable of being pumped under pressure. Larger aggregates such as crushed limestone are generally not used. The mix is usually very wet and plastic so it will flow properly to all portions of the void and even compress some of the soils that it rests upon. There are some exotic mixes that consist of adding a foaming agent to the mix so that the grout is lightweight and porous for the purposes of drainage. Although this type of mix is not generally required for residential mud jacking, there could be some instances where getting a recurring water presence drained away from the underside of the concrete slab is necessary.
Mud jacking is one the best ways to effect concrete repair on a slab that is salvageable, yet needs attention due to settlement. It doesn't lend itself well to the do-it-yourself approach because of the skill and experience level required to know when to shut-off the valve so the slab doesn't over-rise. We recommend you contact a reputable operator near you for estimates.
If you use this procedure to re-elevate your garage floor or driveway to a serviceable condition you can also consider resurfacing the finish to get rid of the visibility of the remaining cracks. We will cover that on other pages.
❖ Testimonials ❖
We have been following your blog and we have found a lot of useful information in it.
Cecil Sibanda
Product Coordinator
Dorman Products, Inc.
Colmar, PA
I was pleased that I was able to easily find the proper tall storage cabinet for my garage. I needed lockable storage to keep my toddler away from sharp tools and solvents that my husband stores. Garagetips-101 solved my problem!
Renee M.
I love the detail in your garage building pages. They helped me understand how to engineer a foundation for a garage we are planning that our building department will approve. I had the inspector go to your pages and review what I was talking about. Now, I am studying the wall framing sections, as we plan to build it ourselves this fall. Thank you so much for the great information.
R.G.,
Des Moines, IA
Great stuff on wall framing. I never really understood the on-and-off spacing concepts for the wall studs until I read your explanations.
Will,
Grand Island, NE


