"Are You Looking For
Simple Garage Shelving Solutions?"
Let us show you our simple and effective garage shelving solution that will get the clutter up off the floor, into a nicely organized pattern, away from dirt and moisture, so that you can travel through the space with ease and have quick access to the items you use on a daily or weekly basis. We will take our previous garage storage plan and remove everything but the shelving solutions so we can focus-in on just that area of garage storage. Shelving is a primary aid when compiling your garage storage and garage organization ideas plan and will go a long way toward solving your garage storage problems.
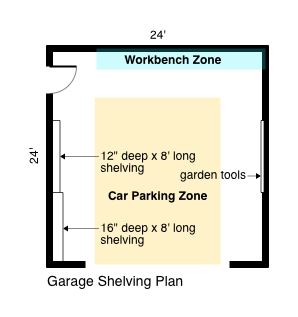
The Garage Shelving Plan shown at the left illustrates where we intend to place our deep and shallow garage shelving, and on the opposite wall where we will place some type of wall-mounted storage for garden tools such as rakes, shovels, brooms, hoses and small tools, etc. We are locating all of these shelving and storage devices in locations that least interfere with traffic alighting from autos and general access to and through the garage.
The general idea is to get enough off-floor garage storage in the right location so that you can broom and hose the floor while moving little if anything in the way of an item that could be stored easily up off of the floor on garage shelving. So keep this in mind when laying-out your own garage storage and garage organization ideas plan and use our ideas, based upon a typical 24' x 24' garage, as a good guideline on how-to-do-it.
As you can see from the Garage Shelving Plan, we start with our deepest shelving in a corner where two walls meet. This gives us our deepest garage storage space in an area where there is very little human traffic so we place our 16" deep shelving setup at that point and then transition back to our more shallow 12" deep shelving where the traffic from cars and the door between the house and garage gets heavier. This makes for easy access and lots of off-floor garage storage that is easy to get to.
So to accomplish this garage shelving project you will need four (4) 3/4" thick x 16" deep x 8 ' long shelf boards that are "melamine" (white) covered on all six-sides and four (4) of the same that are 12" deep. In total, you will need eight (8) shelving boards that are "melamine covered".
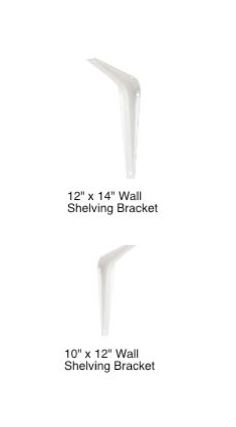
Next, depending on what stud spacing you have inside your garage wall, you will need a number of two different sizes of metal shelving brackets like the ones shown at the right. Assuming your stud spacing is 16" on-center, you will need twenty-four (24) of the 12" x 14" metal shelving brackets and twenty (20) of the 10" x 12" metal shelving brackets. You will also need some 2" long pan-head wood screws to attach the shelving brackets to the wall studs. It takes three per bracket, so you will need at least one-hundred and thirty-two (132) of these screws to complete mounting the brackets to the wall.
Garage Tips: When installing the steel shelving brackets onto the wall, the longest leg of the bracket is the side that gets affixed to the wall and the wood shelving material sits on the shortest leg of the bracket.
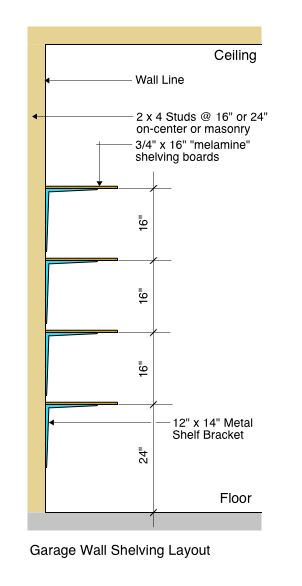
Lets look at the Garage Wall Shelving Layout diagram on the right. We are showing a cross-section through the 16" deep shelving noting the 12" x 14" metal shelf brackets and the 16" deep "melamine" shelf boards. The place to start is with one measurement up from the floor of 24". Keep in mind that your floor probably slopes toward your overhead door for drainage, so we only want to measure up from the floor once, then you will extend that mark across the entire wall with either a 4' or 8' level (An 8' Level is best for long lines).
After you have that line established, then measure up 16" for the next line and extend it across the wall with the level and repeat that process two more times until you have all four lines drawn across the entire wall where the shelving goes. Double check these lines for level to make sure everything is proper so that once your brackets and shelves are in place they look level because they are level.
Garage Tips: The metal wall brackets need to sit in the center of the studs which are 1-1/2" inch wide so that both of the upper side screws catch wood when being screwed in. So take your time in getting the first vertical tier locations (line marks) at the center of the stud. You can do this by taking a finish nail and driving it through the drywall until you can feel exactly where the side of the stud is. Once you get that location, the center of the stud is 3/4" on either side of where the finish nails are.
Another thing to consider is how the 16" deep shelving will transition to the 12" deep shelving. The metal wall brackets are wide enough at their back side so that the 12" x 14" ones will allow both the 16" deep shelving and 12" deep shelving to rest on the bracket.
If you need to do any cutting of the 16" shelf length to accommodate this, then make your cuts on the end of the 16" deep shelving where it dies into the corner wall at the end of the shelving. You may need to trim the lengths of the 16" shelving just a bit in order to get it to sit right in the center of the last 12" x 14" metal shelving bracket, making room for the next 12" deep shelving board. Once you have this worked out a 1/2" long wood screw can go up through that bracket into each shelving underside to hold both firmly in place on the bracket.
Once all of the metal shelving brackets are installed and secure against the wall, you can begin placing your shelving boards on them and securing them from the underside of the metal shelving brackets. Secure them with 1/2" long wood screws placed through the holes provided in the upper portion of the brackets. It is best to start this step at the top row of brackets and work your down until you get to the bottom shelf row.
The beauty of this type of garage shelving is that there are no support-posts need that touch the floor leaving the area under the first row of shelves free and clear for easy-cleaning. You can hose down the floor under them without getting the items stored on the first shelf wet.
All of the materials need for this type of garage shelving project are available at any Big Box Home Store, or your local lumber yard. If you can't get "melamine" coated shelving boards where you are located, you can use 3/4" thick medium density particleboard, ripped to the widths you need, and paint it white to match the metal shelving brackets. This entire project should cost under $200.00 for materials and will take you a long way toward getting your garage storage and garage organization ideas plan into action.
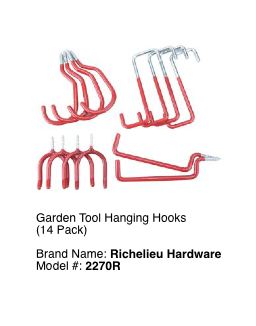
Now lets tackle the garden tool storage project. The simplest approach is to take a 2 x 6 piece of construction grade lumber 9' long and screw it to the 2 x 4 studs in the wall with 4" long wood screws, two at each stud. You can locate the top of the 2x6 at about 5' 6" above the floor and then extend out the line with a level just as instructed above when laying out your garage shelving system. Paint the 2 x 6 white or any color that works in your garage scheme.
Using a 9'- 2 x 6 allows you to leave about 6" overlap past the center of the stud at each end. Once you have this in place you can attach screw-in hanging-hooks at the locations you need for your garden tools. A display of such hooks can be seen above and are just one of many different hook-kits that are available in home-stores or local lumber yards.
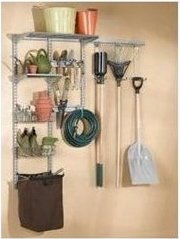
If you want something a bit more flexible for your garden tools storage consider the unit shown at the right. This unit is a combination of modular shelving, hooks, storage bag, and provides 24+/- square feet of storage once installed on your wall. One advantage is that you can have tools at different heights. You should follow the manufacturers installation instructions for this type of unit regarding wall mounting details if you plan on placing large loads upon it.
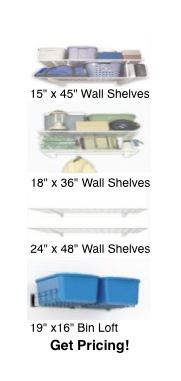
If you are looking for a bit fancier and dust-free garage shelving system consider our Wall Shelving Kits shown at the left.
These units come in a variety of sizes and attach to your wall system. If your loading is not too heavy, these make a great looking system for any shelving project and they are very easy to clean.
These units are ideal in your garage for those items that you need to store close-at-hand and have to get to often. They are simple to install and come with complete installation instructions. If you have metal stud walls or concrete walls, make sure you order our installation kits for those particular structural elements.
Once you have your shelving planned for, you can study our ideas for garage ceiling storage that will aid in getting those storage items that are only accessed seasonally, up and off the floor.

❖ Testimonials ❖
We have been following your blog and we have found a lot of useful information in it.
Cecil Sibanda
Product Coordinator
Dorman Products, Inc.
Colmar, PA
I was pleased that I was able to easily find the proper tall storage cabinet for my garage. I needed lockable storage to keep my toddler away from sharp tools and solvents that my husband stores. Garagetips-101 solved my problem!
Renee M.
I love the detail in your garage building pages. They helped me understand how to engineer a foundation for a garage we are planning that our building department will approve. I had the inspector go to your pages and review what I was talking about. Now, I am studying the wall framing sections, as we plan to build it ourselves this fall. Thank you so much for the great information.
R.G.,
Des Moines, IA
Great stuff on wall framing. I never really understood the on-and-off spacing concepts for the wall studs until I read your explanations.
Will,
Grand Island, NE
