"Want To Learn The Basics Of
Garage Roof Erection?
You Will Find It Here!"
When building a garage, garage roof erection can be accomplished easily if you follow a simple step-by-step process. We will outline the proper approach for you including simple to follow, color-coded illustrations that show where to start - and how to finish. Once your done with sheathing the roof, your garage will be nearly structurally complete, lacking only the wall sheathing that finalizes the structural integrity.
So what should you do first? It all starts with the Ridge board that has to be elevated (and level) so that you can start attaching the angular roof structure members to it.
If you don't have lots of labor available on tall-stepladders to accomplish your garage roof erection, then you will have to come up with a simple support scheme which means you will have to know the exact height of the Ridge board above the lock-plates of the walls.
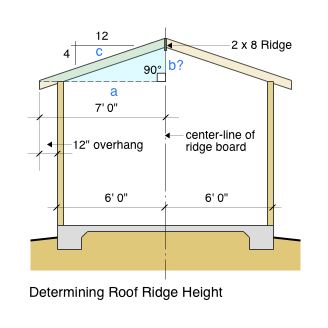
The diagram at the left illustrates the right-triangle that occurs from the top of the lock-plate on the wall, to the center-line of the Ridge board based upon a 4:12 roof pitch. In order to find the height of the top of the Ridge board above the lock-plate, we need to use the Pythagorian Theory mixed with trigonometry to find the length of the "b" leg of the triangle.
Garage Tips: In this Garage Roof Erection article we will be making computations below based upon your use of a scientific calculator. You may want to visit our Roof Framing Primer page to become familiar with the computation approach we are using here. It is covered in full-depth on that page as relates to rafter lengths when building a garage.
We only know the length of the "a" leg, and to get the value for the "b" leg we need to use trigonometry to get the length of the "c" leg. So here is how we compute for it: we have a 4:12 pitch along the "c" leg and if we divide the cosine of the angle of that 4:12 pitch into the known horizontal length of the "a" leg we will get the angular length of the "c" leg.
[4 ÷ 12 =] 0.3333 then, [2ndF tan -1] = 18.4349° then, [cos =] 0.9486. Now we divide the cosine into the length of the "a" leg which is 84" as follows: [84" ÷ 0.9486] = 88.5515".
Now the theorem of Pythagoras is a² + b² = c².
The "a" leg is 84"² = 7056²".
The "c" leg is 88.5515"² = 7841.3681²".
Now, since we can't add the "a" leg to the "b" leg as the theorem requires, we will subtract the "a" leg from the "c" leg to get the squared value of the "b" leg as follows: [7841.3681²" - 7056²"] = 785.3681²".
Next we need to find the square root of 785.3681²" as follows:[785.3681 then, 2ndF √x ]= 28.0244" or 2' 4"+. This will be the approximate height of the Ridge above the top lock-plate of the walls and is the value of the "b" leg of the right-triangle.
Raising The Roof
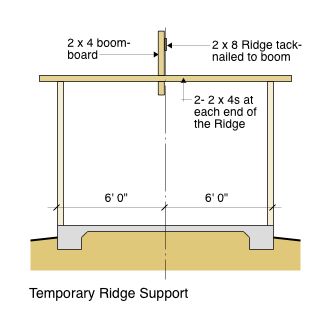
In order to accomplish your garage roof erection, you have to support the Ridge board while you get the Side King Common rafters nailed to it.
You can use the temporary support process shown in the diagram at the right. This is a simple approach where you take two (2) 2 x 4s lengthy enough to span the walls and nail a 2 x 4 boom-board between them at a 90° angle so you can tack-nail the Ridge board to it at the approximate height needed (2' 4"+).
The boom-board is located 3/4" back from the center-line to accommodate one-half the thickness of the Ridge.
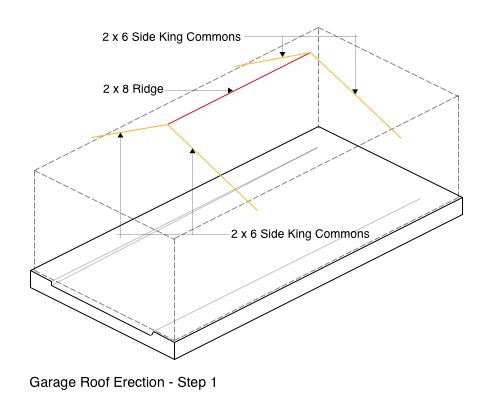
After you have the Ridge up, level, and in place, you can start erecting the Side King Common rafters to it as shown in the Garage Roof Erection - Step 1 diagram below. This is the initial step to supporting the Ridge board with rafters that are locked in at the wall and the ridge. Caution! - make sure your walls are still securely braced and without the structural sheathing on them before you start this process. The wall bracing cannot be removed until the roof sheathing is completely in place.
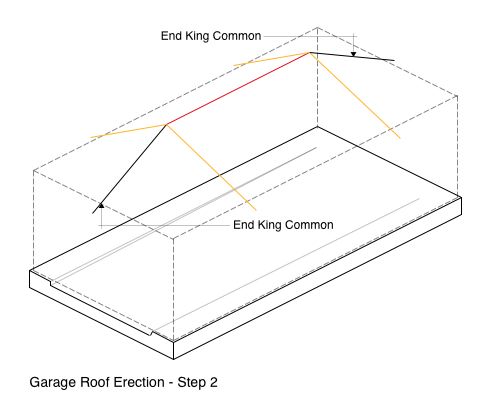
Once you have the Side King Common rafters securely attached the the Ridge board, you can proceed to attach The end King Common rafters to the ridge board as shown in the Garage Roof Erection - Step 2 diagram below. At this point, your roof structure will be semi-stabilized meaning in two (2) directions. Do not remove the Ridge board supports yet though because your roof structure needs to be triangulated with the Hip rafters to be completely stabilized.
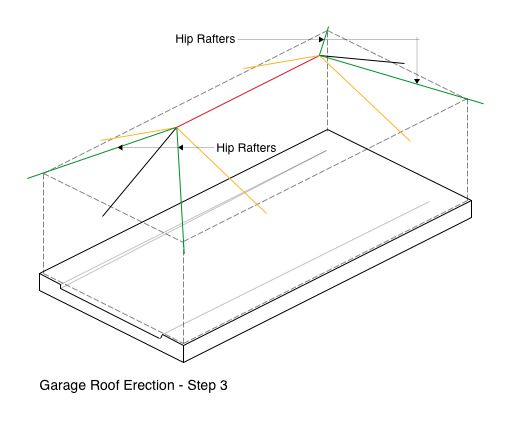
After you have the End King Common rafters in place you can begin to attach each Hip Rafter as shown in the Garage Roof Erection - Step 3 diagram below. Once you have the Hip rafters securely attached your garage roof structure will be triangulated and stable to the point that you can remove the temporary Ridge board supports. The hips form a structural triangle within the remaining roof members. One of the rules of trigonometry is: you cannot change the shape of a triangle unless you change the length of one of it's legs. Therefore, the roof structure is now locked into position and cannot move.
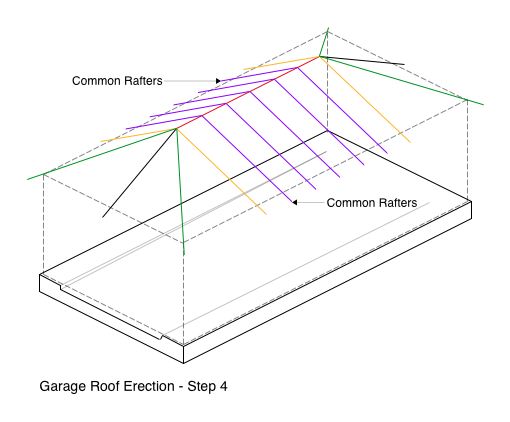
Now you can proceed to attach the Common rafters to the Ridge board as shown in the Garage Roof Erection - Step 4 diagram below. These basically form the rib-cage of the roof and provide a evenly spaced nailing surface to support the structural roof sheathing you will apply. The Common rafters deliver snow and wind loads to the wall structures below that in turn deliver those loads to the foundation supported by the Earth and it's reaction.
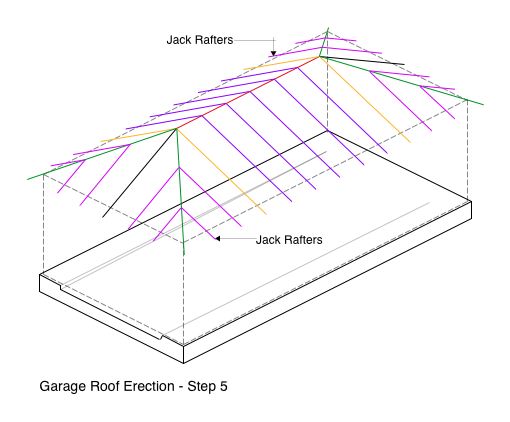
Your next step is to attach the Jack rafters to the Hip rafters as shown in the Garage Roof Erection - Step 5 diagram below. The Jack rafters help stabilize the line of the Hip rafters, and if properly placed with a string line running down the Hip, eliminate any warp and woof in the line of the Hip. The Jack rafters deliver a lesser amount of snow and wind load in comparison the the Common rafters on the long garage walls, yet deliver most of those loads on the short garage walls.
Applying The Roof Sheathing
Most likely, you will be using either 1/2" or 5/8" thick oriented strand board (OSB) in 4' x 8' sheets for your roof sheathing. The sheets must run perpendicular to the direction of the Common rafters and we recommend that you start at the bottom of the roof and in the center of a Side King Common rafter. When you get to the Hip rafter cuts in the sheathing, it is best to measure for their lengths at each end because a 45° angle cut will fall short of what you need. The actual angle along the Hip rafter rise is closer to 47.5°, but don't rely on that in lieu of actually measuring. When building a garage, it is always best to measure everything — twice! Double-check all measurements before cutting wood components or sheathing.
The structural sheathing (OSB) forms a diaphragm and locks the roof members in place on their top sides which aids in overcoming maximum rotational stresses at the bearing points when loading is applied.
The editor's highly recommend that you utilize steel connectors at every rafter along the wall line to resist uplift, and at all Common rafters at the ridge line. Your local building code may require this (or even more) when building a garage and you should check with your local Building Department to learn exactly what they require before applying the roof sheathing.
Once the roof sheathing is securely in place you can remove the wall braces and place the OSB sheathing on the exterior of the walls. This also acts as a diaphragm and takes the place of the diagonal bracing at the corners.
❖ Testimonials ❖
We have been following your blog and we have found a lot of useful information in it.
Cecil Sibanda
Product Coordinator
Dorman Products, Inc.
Colmar, PA
I was pleased that I was able to easily find the proper tall storage cabinet for my garage. I needed lockable storage to keep my toddler away from sharp tools and solvents that my husband stores. Garagetips-101 solved my problem!
Renee M.
I love the detail in your garage building pages. They helped me understand how to engineer a foundation for a garage we are planning that our building department will approve. I had the inspector go to your pages and review what I was talking about. Now, I am studying the wall framing sections, as we plan to build it ourselves this fall. Thank you so much for the great information.
R.G.,
Des Moines, IA
Great stuff on wall framing. I never really understood the on-and-off spacing concepts for the wall studs until I read your explanations.
Will,
Grand Island, NE


