"Have You Thought Of
Simple Garage Ceiling Storage?"
Creating garage ceiling storage for those items you only access seasonally is the perfect solution to getting the clutter up off the floor and getting a totally organized space for parking your cars and using the garage as a workspace for the endless projects that pop-up around your home. Work this category into your garage storage and garage organization ideas planning stage because it really helps when it comes to those items you don't access often.
You can store hunting and fishing gear, coolers, lumber, long-handled tools, etc. that you only use a couple of times a year, and many more items that do not need daily or weekly access, just below the garage ceiling. You can access these items via a stepladder when you do need them. It is easy if you plan for it, so we will take our garage storage plan and remove everything but the ceiling storage designs so we can focus on that area.
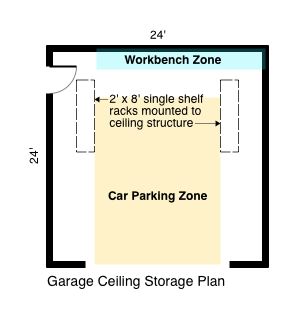
The Garage Ceiling Storage Plan at the left illustrates where we intend to place our 2' x 8' single shelf racks mounted to the ceiling with the intent that we have a minimum of seven feet clearance between the floor and bottom of the rack support brackets. We will be using steel brackets in this illustration that adjust in height and width.
So getting 7' of clearance below the steel brackets will be no problem in the average garage. We are locating these shelf racks for the average sized 2 car garage in a spot that is easy to access from both sides with a stepladder. When you make your own garage storage plan use the same principals mentioned here.
Adjustable Ceiling Shelving

The steel brackets we will be using are shown at the right. Each bracket adjusts from 19" to 30" in width and from 14" to 23" in height. Each bracket is rated by the manufacturer to carry a 100 pound load. These brackets come in pairs of two (2) and you will need four (4) pair for the project we are illustrating.
You will also need the following materials: six (6) 2 x 4s x 32"; four 2 x 4s x 8'; two (2) 3/4" thick medium density particle board pieces that are 24" wide x 8' long and twelve (12) 4-1/2" x 3/8" diameter (max.) long lag-bolts with washers. The key to a safe installation that will carry the loading is attaching the steel brackets to the ceiling structure.
In the project we are illustrating, we are building two 8' long storage racks so you will need two (2) pair of steel brackets for each storage rack and the steel brackets in the middle of the 8' distance will be mounted right next to each other, as close as possible. That way, your entire storage rack length will be able to carry a uniformly distributed load of 400 pounds.
Lets look at the Steel Bracket Mounting Detail below that illustrates how we intend to make a safe connection between the existing garage ceiling structure and the steel brackets. The load will bear on the connection so it is important to get this precise.
You first must locate the existing ceiling joists which are most likely at 24" on-center up above the gypsum board. If they are at 16" on-center for some reason that is okay as you will simply attach your 2 x 4 to three (3) ceiling joists instead of two (2) as shown in the detail. You will need to purchase the 2 x 4s x 36" instead of 32" and get six (6) more lag-bolts.
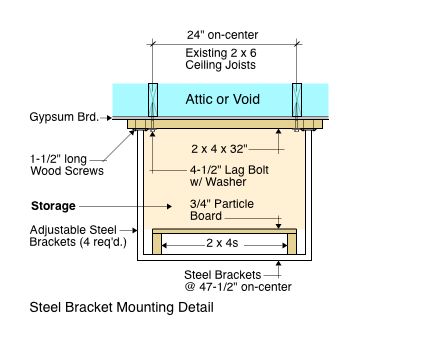
After locating the center-line of the garage ceiling joists you can locate where each of the 2 x 4s shown in the detail are (47-1/2" on-center), and start pre-drilling holes into the ceiling joists 47-1/2" on-center for the lag bolts. You want to get as close to the center of the ceiling joists as possible so that the lag-bolts catch wood-meat for their entire penetration into the joists.
Once you have all of the 2 x 4s mounted to the ceiling, 47-1/2" on-center from each other, you can proceed with attaching the steel brackets to the 2 x 4s. You must use wood screws of the sizes and types recommended by the manufacturer for this step, but at least 1-1/2" long so that they fully penetrate the 2 x 4s.
Next, you can attach your particle board pieces to the continuous 2 x 4s x 8' by gluing and screwing them together. Once assembled, you can slide them in through the end of the steel bracket and across the middle (intermediate) brackets to the end bracket. Adjust into the position you want and place screws through the steel brackets from their bottom side through their pre-drilled holes and into the continuous 2 x 4s x 8'. You can use 2" long pan-head wood screws for this attachment.
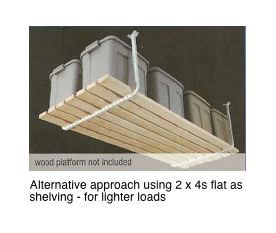
An alternative approach for a bit lighter loading is shown at the left where we use the same HyLoft steel brackets described above but use 2 x 4s laid flat as the shelving for the garage ceiling storage items. Again, the editors recommend spacing the steel brackets at 47-1/2" on-center using the same connection technique as shown above, so if you are building two (2) sets of 96" long storage racks, you will need four (4) pair of brackets. The load limits in this alternative approach will be based upon how much deflection (sag) you get in the 2 x 4s spanning between the brackets, within the 100 pound load limit per bracket mentioned above.
If you want, paint the 2 x 4s on the ceiling to match the ceiling color and paint the shelves white to match the steel brackets. This project should cost under $150.00 for the materials and you will have excellent long-term garage ceiling storage for those items you rarely access. Your garage storage and garage organization ideas planning stage should include this type of long-term storage.
Large Ceiling Mounted Shelving
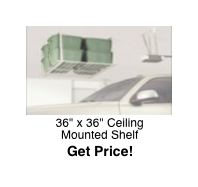
If you want larger capacity garage ceiling storage you can get a 36" x 36" adjustable height ceiling mounted storage rack shown at the left and attach it to the ceiling structure using the same techniques illustrated above and adjusted for the size of that unit. These units can be gang-mounted in a row to whatever length you desire and can be easily accessed along your garage ceiling.
An ever larger garage ceiling storage unit shown below is the 45" x 45" adjustable height garage ceiling mounted storage rack that can also be gang-mounted in a row. The nice thing about these larger racks is that the shelving is wire welded into a steel frame and you can see up from the floor through them to what is being stored.
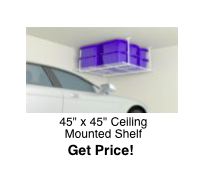
This isn't an issue on the 2' wide shelves we discussed above due to their narrowness, but in these larger racks it is a necessity so that you can easily place your stepladder in the spot where the item is, by visually locating it first. Make sure you take this into consideration when planning your overall garage storage layout scheme.
There other sizes of Ceiling Mounted Shelves available on our GarageTips-101 Store page including special installation kits for concrete ceiling installations; and extender kits. We also have add-on kits to attach to the bottom of the ceiling mounted shelving that are hooks and racks for bicycles, ladders or dimension lumber to aid in your garage ceiling storage plans.
In addition to the fixed garage ceiling storage racks shown on this page, you can also utilize hoist-able storage racks that crank up and down with ease shown on our Garage Storage Systems page. Use the search box below to find other garage storage equipment you may be searching for.
❖ Testimonials ❖
We have been following your blog and we have found a lot of useful information in it.
Cecil Sibanda
Product Coordinator
Dorman Products, Inc.
Colmar, PA
I was pleased that I was able to easily find the proper tall storage cabinet for my garage. I needed lockable storage to keep my toddler away from sharp tools and solvents that my husband stores. Garagetips-101 solved my problem!
Renee M.
I love the detail in your garage building pages. They helped me understand how to engineer a foundation for a garage we are planning that our building department will approve. I had the inspector go to your pages and review what I was talking about. Now, I am studying the wall framing sections, as we plan to build it ourselves this fall. Thank you so much for the great information.
R.G.,
Des Moines, IA
Great stuff on wall framing. I never really understood the on-and-off spacing concepts for the wall studs until I read your explanations.
Will,
Grand Island, NE


