"Do You Want To Know
The Basics Of Wall Framing?
Then Study This
Wall Framing Primer!"
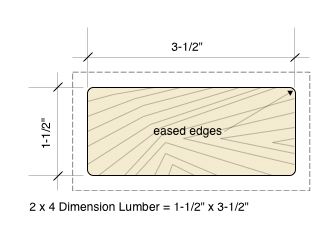
In this wall framing primer we will present to you some very basic information about the components you will be working with when building a garage to frame your garage walls with. For those who are familiar with these basics, it will seem elementary, and you can skip it. For those of you who are not, it will be worth your time to familiarize yourself with this basic information.The main component you will be working with in your garage wall framing stage of building a garage is the 2 x 4 shown below. Notice it doesn't read 2" x 4"! The phrase 2 x 4 is a Call Name for a wall component that actually measures 1-1/2" x 3-1/2".
Prior to World War II, a 2 x 4 measured anywhere from 1-1/2" to 2" x 3-5/8" to 4". Those were the days of plastered wall construction and variations in wall framing thickness were made up with long screed-boards (8') as the three-layers of plaster were applied. It was not very exacting when it came to door and window jamb dimensions, and most were custom cut on the job site for each individual opening.
After World War II, production housing came into play to meet the huge demand of returning veterans and uniform thickness gypsum board replaced plaster walls in wood frame construction in the United States and Canada. This required wall framing components that were very close to uniform, dimensionally.

The new 2 x 4 was born by the process of milling a 2" x 4" (rough-sawn size) into a 2 x 4 call-name component that measured 1-1/2" x 3-1/2". The diagram at the right shows the actual rough-cut 2" x 4" that the 2 x 4 is milled from, within the broken outline.
Following in this wall framing primer, is additional definitive information about the 2 x 4. You need to know these terms, what they mean, and how they relate to each other in the make-up of a wood-framed wall when building a garage.
Wall Framing Primer Definitions
♦ 2 x 4 Stud 8': The pre-cut stud for an 8' high wall measures 92-5/8" and fits between the 2 x 4 Sole Plate (bottom) and the first Top Plate. It travels from bottom to top undisturbed and is a structural member delivering structural loads to the foundation from above (Ceiling and Roof).
♦ 2 x 4 Stud 9': The pre-cut stud for a 9' high wall measures 104-5/8".
♦ 2 x 4 x 8': A 2 x 4 that measures from 8' to 8' 1" in length. These call lengths have to be cut to whatever exact length you need. This applies to all specified call length lumber except pre-cuts which are usually only studs.
♦ On-Spacing: The term for a 2 x 4 component that falls on the spacing plan such as 16" or 24" on-center (actually "edge-to-edge").
♦ Off-Spacing: The term for a 2 x 4 component that falls off of the spacing plan of 16" or 24" on-center such as a King Stud or Trimmer.
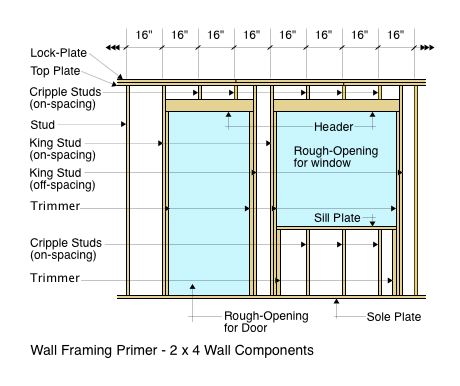
♦ Cripple Stud: A less than full-length 2 x 4 stud that sits over or below a wall opening component such as a Header or Sill Plate, and does not run continuous from the sole plate to the top plate, but is required for continuous on-spacing (see illustration below).
♦ King Stud: A full length pre-cut stud that is the beginning of a rough-opening in the wall. It may be on-spacing or off-spacing. It runs continuous from Sole Plate to the Top Plate. The King Stud is no different from a regular 2 x 4 full-length stud except that it is the beginning and end of a rough opening for a window or door.
♦ Trimmer: A less than full-length 2 x 4 stud that sits inside a King Stud at a rough-opening for a window or door and is the primary structural support for a Header near the top of the rough-opening. Trimmers must be nailed to the King Stud they adjoin with 16d nails every 6" on-center. This aids in transferring some of the structural load they carry to the King Stud.
Study the the Wall Framing Primer diagram below with it's components. Become familiar with the concept of on-spacing and off-spacing. A rough-opening for a door or window can be placed anywhere in the wall. Still, you need your continuous on-spacing component members so that exterior structural sheathing, and interior gypsum board, always have the center of some component to land on for nailing when building a garage.

The spacing scheme at 16" or 24" on-center is designed to accommodate the application of wall materials that are 8' in length. That way, when applying those materials, everything can be cut to fall at the center of a framing component be it a Cripple Stud, King Stud, Stud or Trimmer. Plain Studs and Cripple Studs are always on-spacing. Everything else can be on-spacing or off-spacing, depending upon the layout. A thorough understanding of these wall framing primer elementary basics, will make the wall framing portion of building a garage much easier for the do-it-yourself owner.
❖ Testimonials ❖
We have been following your blog and we have found a lot of useful information in it.
Cecil Sibanda
Product Coordinator
Dorman Products, Inc.
Colmar, PA
I was pleased that I was able to easily find the proper tall storage cabinet for my garage. I needed lockable storage to keep my toddler away from sharp tools and solvents that my husband stores. Garagetips-101 solved my problem!
Renee M.
I love the detail in your garage building pages. They helped me understand how to engineer a foundation for a garage we are planning that our building department will approve. I had the inspector go to your pages and review what I was talking about. Now, I am studying the wall framing sections, as we plan to build it ourselves this fall. Thank you so much for the great information.
R.G.,
Des Moines, IA
Great stuff on wall framing. I never really understood the on-and-off spacing concepts for the wall studs until I read your explanations.
Will,
Grand Island, NE


