"Learn The Basics In This
Roof Framing Primer
Of How To Use Simple Trigonometry
To Determine Rafter Lengths!"
In this Roof Framing Primer, you will learn how to calculate any rafter length using simple trigonometry and a hand-held scientific calculator the way many professional lead-man carpenters are doing it these days. You will also learn how to use the modern-day 16" x 24" framing square for seat cuts and plumb cuts. By the time you finish you should have a clear picture of how to proceed on laying-out any garage roof framing plan before cutting a stick of valuable lumber material for building a garage. For reference purposes, see our Garage Roof Framing page for a plan-view layout of the garage roof design we will be using in this Roof Framing Primer for building a garage roof.
In the old days of the early 1970s when I was interning as an architect, you could still purchase a "standard" 16" x 24" framing square that had all of the possible rafter length calculations printed on one side of it. That square was the standard and authority on "angular lengths" (the hypotenuse) on every job site. They may still be available, but I haven't seen one on a job-site in years.
Today, most carpenters when building a garage or other wood-framed project are using either a Rafter Table booklet they have acquired, a computer program found on a website, or a inexpensive hand-held calculator that fits right in their tool pouch. Once you master the basic trigonometry of the Right Triangle that we show you in this roof framing primer, your hand-held calculator will be as valuable a tool as your power-saw. We hope to educate you in this Roof Framing Primer, so that you can tackle your own project of building a garage like a true craftsman.
Trigonometry is the branch of mathematics that rotates about the ratios between the sides of a right triangle which is any triangle with one (1) 90° angle where two legs meet. A fellow named Pythagoras developed the equation, a² + b² = c² circa 550 B.C. This equation describes the relationship between the sides and hypotenuse of a right triangle and is known as The Pythagorian Theory. While the theorem is limited to determining the length's of a triangle's sides, basic trigonometry can be used to find the degrees of angles as well. This roof framing primer will show you how to employ these principles for building a garage roof or other wood-framed roof.
The Right Triangle
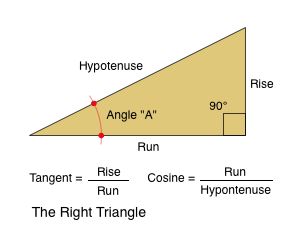
What is impressive about basic trigonometry is how ingenious and simple it is to use. You only need to know two ratios, tangent and cosine. Nearly every carpenter knows what tangent is, but refers to it as "pitch" or "rise/run." Tangent (or pitch) is the ratio between the two sides of a right triangle that form the 90° angle.
Cosine is the ratio between one of these sides and the hypotenuse, as is illustrated in the diagram above. We will be using these mathematical ratio principles in this roof framing primer to illustrate the proper way to compute rafter lengths for building a garage roof.
Basic trigonometry has become very accessible for builders due to the fact that scientific calculators have become very inexpensive. You can purchase one for under $20.00. I use a twenty-five year old Texas Instruments TI-35 Plus that cost around $60.00 when I bought it. It still works fine and uses up a battery about every 8 years. Any brand or model will do for use in these roof framing primer exercises, as long as it has basic trigonometric functions.
Converting Decimals
(If you are already familiar with converting decimals - skip this portion of the roof framing primer.)
Since most calculators compute in decimals, and most building measurements are in feet, inches, and fractions of inches under Imperial Measurement Standards, you need to know how to convert from decimal measurements to fractions or vice versa.
If you want to convert 7.77 feet to fractions, first subtract 7 (the whole number of feet) away from the screen leaving 0.77 on the calculator screen. Then multiply 0.77 times 12, which will convert feet to inches:
[.77 x 12] = 9.24 inches.
So, 7.77 feet in decimal expression equals 7' 9-1/4", almost. The difference between 9.24" and 9.25" is the thickness of your pencil line on the wood rafter depending on how sharp your pencil is. It is not worth reducing the conversion into sixteenths or thirty-seconds because a standard tape-measure will not allow for that kind of accuracy. But you can reduce it further using the same technique as shown above, and in some cases it may be necessary. In the trades on the job-site, the measurement is called-out to the cut-man as "a light seven feet nine and one quarter inches." The cut-man knows that "light" means a variance of less than 1/16".
We will continue in this roof framing primer with calculating common rafter lengths based upon the 12' x 24' garage we started with on our Garage Foundation page(s) and continued on our Garage Wall Framing page(s). If you haven't visited those pages yet, it may be worth your while as there is information there that you may find useful about building a garage.
The Roof Framing Primer System For
Calculating Common Rafter Length
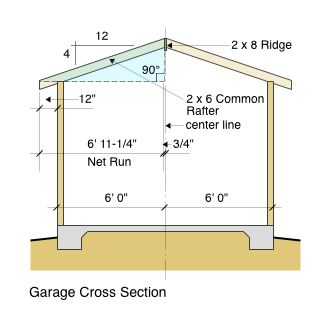
In order to utilize basic trigonometry as a construction tool, you must visualize the right triangles within the framework of your roof design. Look at the Garage Cross Section at the right. It shows that our 2 x 8 Ridge will be at dead-center between the outside walls. The center-line of the garage structure runs right through the center of the Ridge. The blue-shaded area forms the right triangle we are speaking of. We are viewing a section here where the common rafters occur.
Our "net run" for the horizontal length of a common rafter will be 6' 11-1/4" and is derived as follows: We take the horizontal length of one-half of our roof framing primer garage structure (6' 0"), plus the horizontal length of our roof overhang (12"), minus one-half the thickness of the Ridge (3/4") and convert the sum to inches.
(72" + 12") - 0.75" = 83.25" or 6' 11-1/4".
So we now have an exact net run, or horizontal distance, that our common rafters need to cover in order to accomplish our design intent of a hip roof over a 12' 0" wide garage, with a 12" horizontal projection overhang. Now we need to know how long a piece of 2 x 6 lumber we will need for our common rafters in order to accomplish this because that length will be based upon our roof pitch line (hypotenuse) of the ratio 4:12, meaning the rafter climbs 4" in vertical height for every 12" of horizontal cover.
On your calculator press [4÷12 =], and 0.3333 appears. That number which is the rise divided by the run, is the trigonometric function know as tangent. You then press [2ndF tan<span style='font-size: 50%'>-1] to convert the tangent to degrees, and 18.4349 appears.
Garage Tips: The 2ndF key means second function and works like the shift-key on your computer keyboard and it may just be shown simply as "2nd" on some calculators, so study the instructions that come with yours and become familiar with how it operates.
Our roof framing primer shows that we will have a roof that will sit at 18.4349° above the horizon line due to our 4:12 pitch design. Now we will compute what length of lumber we will need to accomplish our design as follows: to find the hypotenuse of the right triangle, you use run ÷ cosine = hypotenuse. With 18.4349 still on the screen of your calculator, press [cos] and 0.9486 appears. This is the cosine of 18.4349°.
Next, we enter in the length of our net horizontal run in inches of 83.25 and divide the cosine of 0.9486 into it and our result equals 87.7609 inches [83.25 inches ÷ 0.9486 cosine =] 87.7609" or approximately 7' 3-3/4" plus. The plus will be less than 1/16" if you follow the format shown above on how to convert decimals to feet and inches. Now we know we will need 2 x 6 x 8' lumber for all of our Common Rafters, End King Commons and Side King Commons, on each side of the Ridge.
There is one more length we need to know and that is where our seat cut over the 2 x 4 wall will occur. To compute this we take one-half the width of the garage [72"] ,minus the thickness of the wall [4"], minus one-half the thickness of the Ridge [3/4"] and the sum equals: 67.25" or 5' 7-1/4" which is the horizontal run from the inside face of the wall to the outer face of the ridge.
Now we enter into our calculator the length of our horizontal run from wall to ridge in inches of 67.25 and divide the cosine of 0.9486 into it and our result equals 70.8939" or approximately 5' 10-7/8" plus. The plus will be less than 1/16".
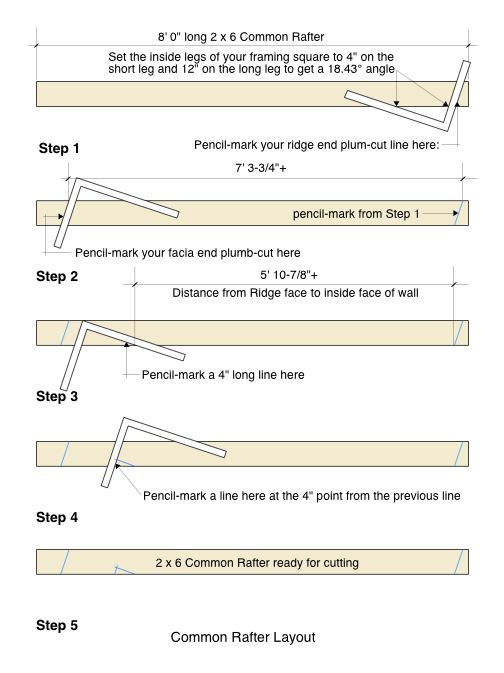
Now, let's lay out a typical common rafter and see exactly where all of our cuts will have to be located on the board and how to accomplish that with the 16" x 24" framing square. This roof framing primer provides the Common Rafter Layout diagram below for illustration.
Step 1: Take your 2 x 6 x 8' common rafter lumber and near the Ridge end of the board set-up your framing square so that the inside of the short leg is set to four inches (4") and the inside of the long leg is set to twelve inches (12"). That will give you the 4:12 pitch ratio and the resulting angle will be 18.4349°. Pencil-mark the plumb-cut as shown in the diagram below.
Step 2: Measure from your pencil-mark you just made 7' 3-3/4"+ and make a small pencil mark where that distance occurs on the board. Now move your framing square to the other end of the board and set it up the same way you did on the other end and make your pencil-mark for the facia end plumb-cut.
Step 3: Now measure from the bottom side of the ridge end plumb-cut a distance of 5' 10-7/8"+ and make a small pencil-mark to establish the start of the seat-cut where the rafter will rest upon the wall. Move your framing square to this mark and then place a pencil-mark 4" long.
Step 4: Now move your framing square to the end of the 4" line and make a short pencil-mark that will establish a small plumb-cut that will return down the face of the exterior of the wall.
Step 5: You now have a fully marked-up common rafter ready to cut as shown in the diagram below.
The End King Common and Side King Common rafters will use this same identical layout of the Common Rafters. None of these rafters will have compound miter cuts so you will be setting your hand-held power-saw table at 90° to the plane of the blade.
Where the seat-cut occurs, you will have to hand-saw the final portion of the cut in both directions due to the fact that the radius of the blade won't reach into the full depth of the cut on the underside of the board. It is best not to run your power-saw past these marks on the top side of the board so as not to weaken the lumber where the roof overhang occurs.
Now lets look at how to compute the length of our hip rafters and calculate the location of the cuts they will require.
Calculating Hip Rafter Length
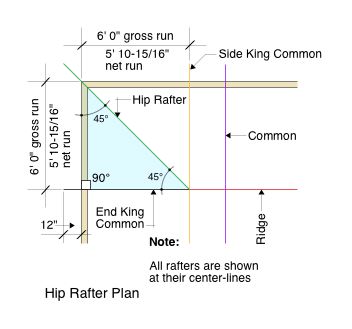
Study the roof framing primer Hip Rafter Plan at the left. It shows the center-line location of the Ridge, Hip Rafter, End King Common Rafter, Side King Common rafters and a few Common rafters. We are also displaying the run distance (6' 0") and the net run distance.
The net run (horizontal length) is determined by subtracting one-half the thickness (1-1/16") of the End King Common and/or Side King Common from the run of 6' 0". [72" - 1.0606 " =] 70.9394" or 5' 10-15/16" which is our horizontally measured net run inside the outer edge of the walls.
Editor's Note: The one-half rafter thickness used (1-1/16") in the calculation above is different than the 3/4" used in prior calculations for Common Rafters because they meet the Ridge at a 90° angle, and the hip meets all other members at a 45° angle. It is computed by taking one-half the Ridge thickness of 3/4" and dividing it by the cosine of a 45° angle (45 [cos] = 0.7071). [0.75 ÷ 0.7071 =] 1.0606" or 1-1/16". Continuing with the roof framing primer:
Now we will add 12" of overhang to our horizontal net run of 5' 10-15/16" in order to ultimately arrive at a computation for our overall rising length of the Hip Rafter. [12" + 5' 10-15/16" =] 6' 10-15/16" or 82.9375". Now we will compute the overall length along the horizontal 45° angle line as follows: [82.9375 ÷ 0.7071 =] 117.2924" or 9' 9-15/16". Next, we divide 82.9375 inches by the cosine of 4:17 pitch [4 ÷ 17 = ( 0.2352 2ndF tan<span style='font-size: 50%'>-1 = 13.2405° (cos)] = 0.9743. Now [117.2924" ÷ 0.9734 =] 120.4947" or 10' 0-1/2". That will be our overall Hip Rafter length.
The roof framing primer will now show you how to find the seat-cut mark. We start by shortening our gross run of 6' 0" by the 4" thickness of the wall which will equal 5' 8" or 68.0" Then we divide the 68" by the cosine of the 45° angle as follows: [68" ÷ 0.7071 =] 96.1617" or 8' 0-3/16". Now we need to compute the rising length of the seat-cut mark so we take the 96.1617" and divide it by the cosine of 4:17 pitch as we did above and we get [96.1617" ÷ 0.9743 =] 98.6982" or 8' 2-11/16". That is our seat-cut starting point.
The depth of our seat cut will be the 4" thickness of the wall divided by the cosine of the 45° angle [4" ÷ 0.7071 =] 5.6569" or 5-11/16". See the Hip Rafter Layout diagram below for the layout process.
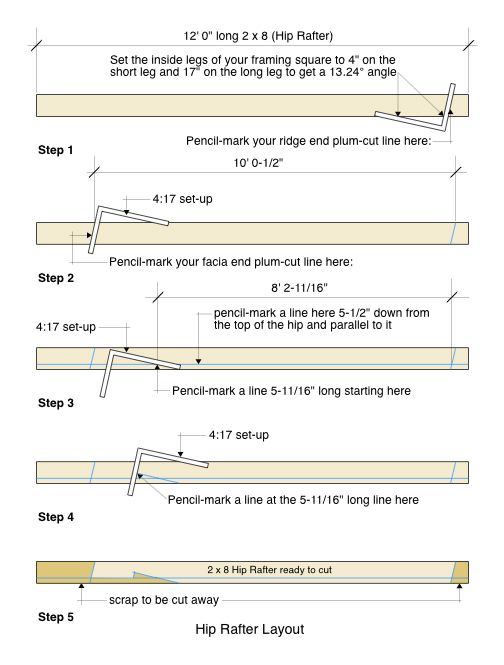
The roof framing primer shows that hip rafters have a different pitch because they transect the building diagonally. They rise the same distance as common rafters but they have a longer run due to the fact that they are at a 45° angle. Instead of 12 - the unit run of hip rafters is 17, which is the rounded-off length of the hypotenuse of an isosceles triangle with two 12" sides.
Calculating Jack Rafter Length
Unlike the hip rafters, the jack rafters have the same pitch as the common rafters. If you start your jack rafter layout at the corner of the building, then computing the lengths of the Jack Rafter will be the same process as for the Common Rafters explained above in this roof framing primer. The only difference is that when you subtract from the length of the jack rafter, the thickness of one-half of the member it connects with, you subtract 1-1/16" like with the Hip Rafter instead of 3/4" as with the Common Rafters. This is because the Jack Rafter intersects and connects at a 45° angle, just as the Hip Rafter does.
Keep in mind that the Jack Rafter will have a compound miter cut where it connects to the Hip Rafter. Also, the additional length of each succeeding jack rafter, after the first jack rafter, is approximately whatever spacing you are using between the jack rafters. In the examples we are showing here, that would be 24".
Calculating Ridge Length
Unlike all rafters, the Ridge sits dead-level (or is supposed to) and it is fairly easy to calculate it's necessary length. In the example we have been illustrating for a 12' x 24' garage there are four hips at 45° angles with a 6' gross run as shown in the Hip Rafter Plan diagram above. The gross run occurs at all corners of the building, so we can subtract a total of 12' from our overall 24' garage length. That leaves 12' for the Ridge length if we just accounted for ridge material to the center-line of the Side King Common rafters. Since we need to have those side king rafters fully contacting the ridge, we need to add 3/4" to it's length at each end. The Ridge board will have to be 12' 1-1/2".
In this roof framing primer we have been dealing with a roof pitch of 4:12. You can use all of the same trigonometry shown above by computing a new cosine for a 5:12, 7:12 or 3.5:12 roof pitch or any other possible roof pitch when building a garage or other roof. If your 3.5:12 pitch roof (or other pitch) has hips (and/or valleys) just remember that they have a run of 17 instead of 12 if they are on a 45° angle.
As you may have suspected from reading this roof framing primer, trigonometry and the scientific calculator can free you from the Rafter Table booklet, and having to replace it every few months due to wear on the job-site. Once you master the concepts of tangent and cosine, you will be on your way to a better way of computing roof calculations, or any construction problem involving angles.
If you have found this Roof Framing Primer of value, or would like to comment, please visit our Contact Us page, and tell us what you think so we know what type of information you are seeking, and if you find this Roof Framing Primer to be helpful information for building a garage roof that is wood-framed.
Next visit our Garage Roof Framing page for more detailed information about how to layout a garage roof and other information concerning Hip Rafters.
❖ Testimonials ❖
We have been following your blog and we have found a lot of useful information in it.
Cecil Sibanda
Product Coordinator
Dorman Products, Inc.
Colmar, PA
I was pleased that I was able to easily find the proper tall storage cabinet for my garage. I needed lockable storage to keep my toddler away from sharp tools and solvents that my husband stores. Garagetips-101 solved my problem!
Renee M.
I love the detail in your garage building pages. They helped me understand how to engineer a foundation for a garage we are planning that our building department will approve. I had the inspector go to your pages and review what I was talking about. Now, I am studying the wall framing sections, as we plan to build it ourselves this fall. Thank you so much for the great information.
R.G.,
Des Moines, IA
Great stuff on wall framing. I never really understood the on-and-off spacing concepts for the wall studs until I read your explanations.
Will,
Grand Island, NE


