"Want To Construct
Garage Roof Framing
The Way True Craftsmen Do?"
Garage roof framing is a bit more complicated than wall framing because you are dealing with angles other than ninety-degress and some of the saw cuts involve compound miters on each side of the hip rafter if you are building a garage with a hip roof.
We are going to continue on with the 12' x 24' garage that we started with in the Garage Foundation page articles and continued with in the Garage Wall Framing page articles concerning building a garage. If you haven't reviewed those pages yet you may find interesting information on them that will aid you in the garage roof framing process.
Many carpenters don't like to build hipped-roof projects because they deem them to be overly complicated. The knowledge and skills to build a hip roof is only a bit more than is needed to build a gabled roof garage, so we will be illustrating the hip roof version with a 4:12 pitch so that you can fully master all of the garage roof framing techniques related to building a garage or other wood-framed structure.
Study the color coded garage Roof Framing Plan below. We have assigned a unique color to each distinct roof member type that you will need to create from dimension lumber. The unique members are all labeled with their appropriate name once, and then the color coding tells you which other members are identical structurally to the labeled member.

As you can see, we have one (1) Ridge Board; four (4) Side King Common Rafters; two (2) end King Common Rafters; four (4) Hip Rafters; ten (10) Common Rafters (which are identical to the Side King Common Rafters); and, sixteen (16) Jack Rafters.
When it comes to varying rafter cuts, here is how this plan will breakdown:
♦ The Side King Common and Common Rafters will each have identical rafter lengths and cuts where they meet the Ridge and the Lock Plates.
♦ The Hip Rafters will each have identical rafter lengths and cuts where they meet the Ridge and the Lock Plates.
♦ The End King Common Rafters will each have identical rafter lengths and cuts where they meet the Ridge and Lock Plates.
♦ The longest Jack Rafters will each have identical lengths but half of them will have cuts that are reversed from the other half where they meet the Hip Rafters. Each will have identical cuts where they meet the Lock Plates.
♦ The shortest Jack Rafters will each have identical lengths but half of them will have cuts that are reversed from the other half where they meet the Hip Rafters. Each will have identical cuts where they meet the Lock Plates.
Now that you know each of the components that your hip roof will be constructed from, lets look at the next important phase, which is laying-out the location of each component on the Lock Plate of your walls.
The Large Scale Roof Framing Layout Plan shown below is a enlarged version of the upper left hand corner of the garage Roof Framing Plan above. It gives you detailed dimensions as to how to start the layout from the corner shown. The key here is taking into consideration the fact that your 1/2" structural sheathing has not yet been applied to the stud framed walls. You have to account for the dimensional thickness of the sheathing in locating where your first components will be located.
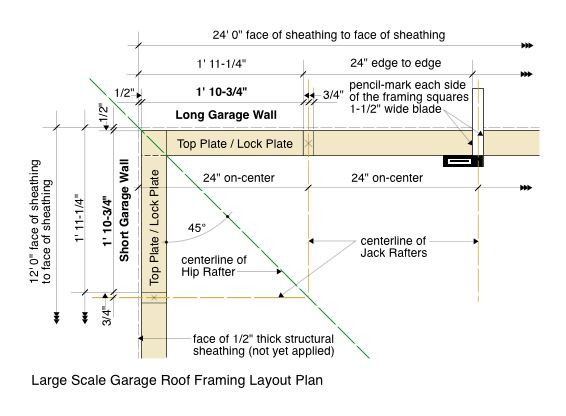
We are using 24" spacing for the roof rafters so the trick is to get the first Jack Rafter located using the dimensions shown, and then you can go quickly by measuring 24" edge to edge for the remainder of each wall. For example, if we measure 1' 10-3/4" from the face of the studs on the Short Garage Wall (without sheathing) and mark the Lock Plate on the Long Garage Wall and then lay your small framing square at the mark and pencil-mark both sides of the square, you will have the location of the first Jack Rafter (shown with an "X" in the middle).
The reason for these dimensional adjustments at the starting point is that your finished garage wall of 24' 0", at this point in the construction process, is only 23- 11" because the sheathing is not yet applied.
Once the first Jack Rafter is located, then move down the Lock Plate at 24" edge to edge and pencil-mark the rest of your component locations. Then do the same on the other Long Garage Wall starting at the same end you did on the first long wall. Then do the Short Garage Walls making sure to start at the same corner on each wall. Starting in the same corner makes sure that all rafters will be in direct opposition at the Ridge and Hip Rafters.
We don't want the rafters offset because it places extreme fiber stress on the lumber material of the Ridge Board at the common line of each rafter as shown in the illustration below. With a snow load on each side of the roof, rafters that are offset can cause the Ridge Board to fail from shear forces. Dimension lumber has greater strength in compression than in shear, so we directly oppose the rafters against the ridge and hips. Still, you will need stress rated lumber for both the ridge and hips in the form of #1, grade-marked lumber.
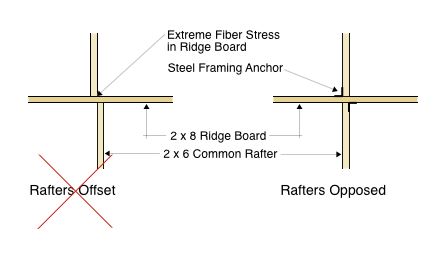
Garage Tips: Offset rafter framing can be done on garage roof framing if you are building a garage from plans that are sealed by a professional architect or structural engineer licensed within the jurisdiction you are building a garage in, if those designs specify rafter offset. There are certain situations where offset is more practical than opposed rafters which usually occurs on very complicated roof framing schemes.
As you move along with your pencil-markings, make sure you are staying on-centering or edge to edge with your measurements. Double check everything you do before proceeding to cut your lumber to length. That is the best insurance for successful garage roof framing when building a garage or other wood-framed structure.
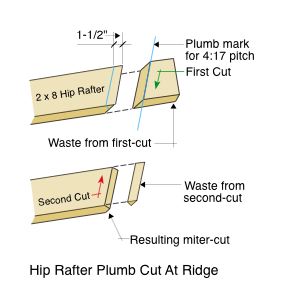
The Hip Rafter Plumb Cut At The Ridge End
You will need your Hip Rafters to have a plumb-cut miter where they meet with the sides of the End King Common and Side King Common rafters.
The best approach to this is to follow the illustration at the left and mark your 4:17 pitch plumb-cut near the end of the Hip Rafter where it will join the Ridge and abut the end and king common rafters. (See the Roof Framing Primer page to learn why the plumb-cut on a hip rafter (or valley rafter) is set to 4:17 for a 4:12 pitch roof).
To make this cut, scribe two (2) parallel plumb-cut lines 1-1/2" apart. Set your saw-blade to a 45° angle and saw along both lines in opposite directions. When finished you will have a nice tight fit between the King Common Rafters with the point of the miter touching the Ridge.
There is a problem though with the Hip Rafter in general and we will deal with that next while we are talking about Hip Rafters.
The Hip Rafter Problem
The problem we will deal with now is why many carpenters dislike framing hip roofs. Here is the problem: without modification to the Hip Rafter, the top edges will be higher than the King Common Rafters and the End Common Rafters, causing the structural roof sheathing to rise over the hips. This is unacceptable, so there are two solutions to the problem described as follows:
♦ The first solution is called "dropping the hip rafter" and we are not going to illustrate that solution because it is inferior to the proper solution.
♦ The proper solution is called "beveling the hip" and we will illustrate that solution for the reason that it is superior to the first solution as it allows full contact of the roof sheathing with the Hip Rafter surface which is a structural plus.
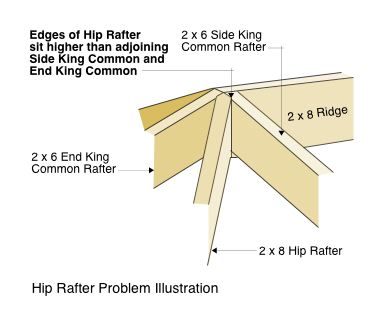
First lets look at the illustration to the left to see what the problem is. The problem comes down to the fact that the Hip Rafter, when properly calculated and cut for length, will end up with it's outer edges sitting higher than the outer edges of the adjoining Side King Common Rafter and End King Common Rafter.
The center of the Hip Rafter will be exactly at the right elevation, but with the outer edges higher, it presents a problem for the roof sheathing which won't rest in the same plane, which makes for poor garage roof framing.
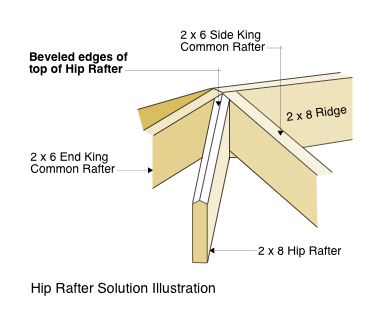
For proper garage roof framing, the solution to this problem is to bevel the upper edges of the Hip Rafters as shown in the illustration to the right, from the center-line out to each edge. This can be done with a power-saw or with a hand-held planer. The easiest way to calculate how much material needs to be removed, and at what angle, is to set a hip rafter in place and pencil-scribe the line onto it where it meets the End King Common and the Side King Common.
That will give you the precise angles that you need. Then you can extend the lines down the face sides of the Hip Rafter and down the center of the top side and begin either sawing or planing the material away.
Next, visit our Roof Framing Erection page and we will study the proper way to erect your garage roof framing components when building a garage.
❖ Testimonials ❖
We have been following your blog and we have found a lot of useful information in it.
Cecil Sibanda
Product Coordinator
Dorman Products, Inc.
Colmar, PA
I was pleased that I was able to easily find the proper tall storage cabinet for my garage. I needed lockable storage to keep my toddler away from sharp tools and solvents that my husband stores. Garagetips-101 solved my problem!
Renee M.
I love the detail in your garage building pages. They helped me understand how to engineer a foundation for a garage we are planning that our building department will approve. I had the inspector go to your pages and review what I was talking about. Now, I am studying the wall framing sections, as we plan to build it ourselves this fall. Thank you so much for the great information.
R.G.,
Des Moines, IA
Great stuff on wall framing. I never really understood the on-and-off spacing concepts for the wall studs until I read your explanations.
Will,
Grand Island, NE


